一次對MKMapView的性能優(yōu)化
最近做的項目主要是LBS這塊 主打成員定位功能 我們的UI設(shè)計是這樣的
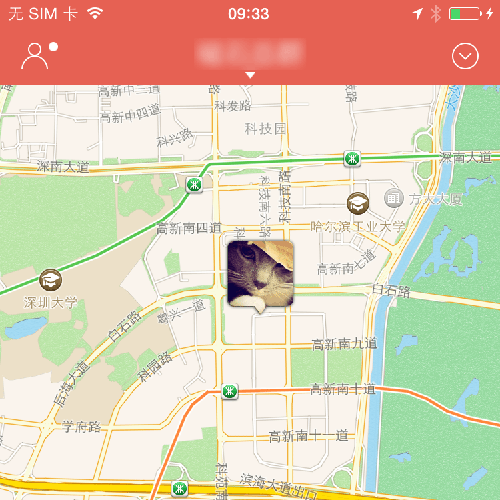
乍一看上去是挺好挺美觀的 不同的人會顯示不同的頭像 可是當人扎堆的時候 問題就來了
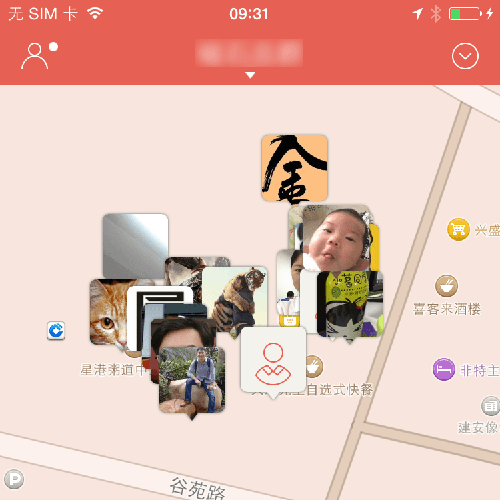
當人多的時候(例如上圖所示) 地圖滑動起來就能感覺到明顯頓卡 那種不流暢感能折磨死人 所以 自然我們要解決這個問題(等等 先不要吐槽為什么不用地圖聚合 因為這已經(jīng)是地圖放到***了 聚合不適合這次的問題討論)
分析
首先看下我是怎么實現(xiàn)這個annotationView的 由于這個annotationsView是異形的(也就是無法通過設(shè)置圓角直接得到) 而且里面的圖片還因用戶而異 所以解決方案就是使用layer.mask來進行遮罩 代碼如下
- @implementation MMAnnotationView
- - (instancetype)initWithAnnotation:(id)annotation reuseIdentifier:(NSString *)reuseIdentifier
- {
- self = [super initWithAnnotation:annotation reuseIdentifier:reuseIdentifier];
- if ( self )
- {
- self.frame = CGRectMake(0, 0, TRACK_ANNOTATION_SIZE.width, TRACK_ANNOTATION_SIZE.height);
- self.centerOffset = CGPointMake(0, -(TRACK_ANNOTATION_SIZE.height-3)/2);
- self.canShowCallout = NO;
- self.avatarView = [[UIImageView alloc] initWithFrame:self.bounds];
- [self addSubview:self.avatarView];
- self.avatarView.contentMode = UIViewContentModeScaleAspectFill;
- CAShapeLayer *shapelayer = [CAShapeLayer layer];
- shapelayer.frame = self.bounds;
- shapelayer.path = self.framePath.CGPath;
- self.avatarView.layer.mask = shapelayer;
- self.layer.shadowPath = self.framePath.CGPath;
- self.layer.shadowRadius = 1.0f;
- self.layer.shadowColor = [UIColor colorWithHex:0x666666FF].CGColor;
- self.layer.shadowOpacity = 1.0f;
- self.layer.shadowOffset = CGSizeMake(0, 0);
- self.layer.masksToBounds = NO;
- }
- return self;
- }
- //mask路徑
- - (UIBezierPath *)framePath
- {
- if ( !_framePath )
- {
- CGFloat arrowWidth = 14;
- CGMutablePathRef path = CGPathCreateMutable();
- CGRect rectangle = CGRectInset(CGRectMake(0, 0, CGRectGetWidth(self.bounds), CGRectGetWidth(self.bounds)), 3,3);
- CGPoint p[3] = {
- {CGRectGetMidX(self.bounds)-arrowWidth/2, CGRectGetWidth(self.bounds)-6},
- {CGRectGetMidX(self.bounds)+arrowWidth/2, CGRectGetWidth(self.bounds)-6},
- {CGRectGetMidX(self.bounds), CGRectGetHeight(self.bounds)-4}
- };
- CGPathAddRoundedRect(path, NULL, rectangle, 5, 5);
- CGPathAddLines(path, NULL, p, 3);
- CGPathCloseSubpath(path);
- _framePath = [UIBezierPath bezierPathWithCGPath:path];
- CGPathRelease(path);
- }
- return _framePath;
- }
- 我用代碼生成了形狀路徑 并以此生成了layer的mask和shadowPath
- 使用時 只要直接用SDWebImage設(shè)置頭像就行了
- 1
- [annotationView.avatarView sd_setImageWithURL:[NSURL URLWithString:avatarURL] placeholderImage:placeHolderImage];
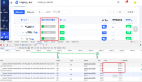
接下來用工具分析一下問題出來哪 分析性能當然是選擇Instrments(用法在這里就不做介紹了) 打開Core Animation 然后運行程序 滑動地圖 可以看到性能分析如下

原來平均幀數(shù)只有不到30幀 這離我們的目標60幀差得實在太遠
再使用Debug Option來深入分析一下

由于MKMapView的原因 這里我們主要關(guān)心這幾個選項
Color Blended Layers
Color Misaligned Images
Color Offscreen-Rendered Yellow
分別打開這幾個選項 結(jié)果如下
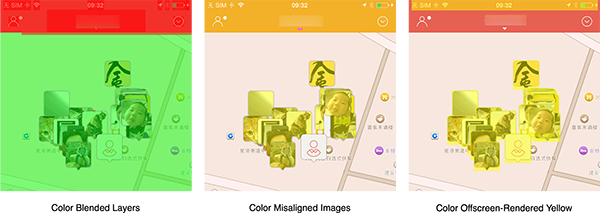
可以看到
Color Blended Layers沒有問題 不過這也是正常的 由于使用了mask 沒有透明的地方
Color Misaligned Images除了默認頭像外全中 這是因為服務(wù)器上的圖片大小跟顯示的大小不一致 導(dǎo)致縮放 而默認頭像則是一致的 所以沒問題
Color Offscreen-Rendered Yellow全中 由于使用了mask 導(dǎo)致大量的離屏渲染 這也是性能下降的主要原因
解決
問題的原因找到了 那么接下來該如何解決呢?
首先mask是肯定不能用了
其次下載下來的圖片我們要預(yù)處理成實際大小
那么 直接把下載下來的圖片合成為我們要顯示的最終結(jié)果不就ok了嗎? 試試看
- - (void)loadAnnotationImageWithURL:(NSString*)url imageView:(UIImageView*)imageView
- {
- //將合成后的圖片緩存起來
- NSString *annoImageURL = url;
- NSString *annoImageCacheURL = [annoImageURL stringByAppendingString:@"cache"];
- UIImage *cacheImage = [[SDImageCache sharedImageCache] imageFromDiskCacheForKey:annoImageCacheURL];
- if ( cacheImage )
- {
- //LLLog(@"hit cache");
- imageView.image = cacheImage;
- }
- else
- {
- //LLLog(@"no cache");
- [imageView sd_setImageWithURL:[NSURL URLWithString:annoImageURL]
- placeholderImage:placeHolderImage
- completed:^(UIImage *image, NSError *error, SDImageCacheType cacheType, NSURL *imageURL) {
- if (!error)
- {
- UIImage *annoImage = [image annotationImage];
- imageView.image = annoImage;
- [[SDImageCache sharedImageCache] storeImage:annoImage forKey:annoImageCacheURL];
- }
- }];
- }
- }
- @implementation UIImage (LJC)
- - (UIImage*) annotationImage
- {
- static UIView *snapshotView = nil;
- static UIImageView *imageView = nil;
- if ( !snapshotView )
- {
- snapshotView = [UIView new];
- snapshotView.frame = CGRectMake(0, 0, TRACK_ANNOTATION_SIZE.width, TRACK_ANNOTATION_SIZE.height);
- imageView = [UIImageView new];
- [snapshotView addSubview:imageView];
- imageView.clipsToBounds = YES;
- imageView.frame = snapshotView.bounds;
- imageView.contentMode = UIViewContentModeScaleAspectFill;
- CGFloat arrowWidth = 14;
- CGMutablePathRef path = CGPathCreateMutable();
- CGRect rectangle = CGRectInset(CGRectMake(0, 0, CGRectGetWidth(imageView.bounds), CGRectGetWidth(imageView.bounds)), 3,3);
- CGPoint p[3] = {
- {CGRectGetMidX(imageView.bounds)-arrowWidth/2, CGRectGetWidth(imageView.bounds)-6},
- {CGRectGetMidX(imageView.bounds)+arrowWidth/2, CGRectGetWidth(imageView.bounds)-6},
- {CGRectGetMidX(imageView.bounds), CGRectGetHeight(imageView.bounds)-4}
- };
- CGPathAddRoundedRect(path, NULL, rectangle, 5, 5);
- CGPathAddLines(path, NULL, p, 3);
- CGPathCloseSubpath(path);
- CAShapeLayer *shapelayer = [CAShapeLayer layer];
- shapelayer.frame = imageView.bounds;
- shapelayer.path = path;
- imageView.layer.mask = shapelayer;
- snapshotView.layer.shadowPath = path;
- snapshotView.layer.shadowRadius = 1.0f;
- snapshotView.layer.shadowColor = [UIColor colorWithHex:0x666666FF].CGColor;
- snapshotView.layer.shadowOpacity = 1.0f;
- snapshotView.layer.shadowOffset = CGSizeMake(0, 0);
- CGPathRelease(path);
- }
- imageView.image = self;
- UIGraphicsBeginImageContextWithOptions(TRACK_ANNOTATION_SIZE, NO, 0);
- [snapshotView.layer renderInContext:UIGraphicsGetCurrentContext()];
- UIImage *copied = UIGraphicsGetImageFromCurrentImageContext();
- UIGraphicsEndImageContext();
- return copied;
- }
- @end
然后使用的時候 只要簡單的如下調(diào)用就OK了
- [self loadAnnotationImageWithURL:avatarURL imageView:annotationView.avatarView];
看看修改之后的Instruments表現(xiàn)如何
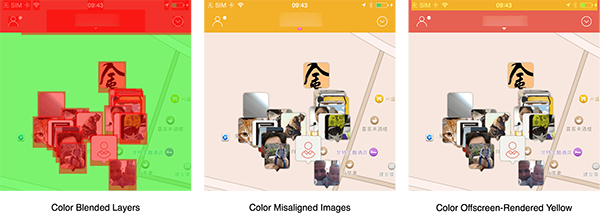
Color Blended Layers全中 這也是無可避免的 因為顯示的就是一張帶透明度的圖 但是由于地圖的特殊性(頭像的位置變化間隔較長 所以不會經(jīng)常引發(fā)合成 也沒有動畫) 所以這里也不是問題
Color Misaligned Images沒問題了 因為頭像已被縮放成了相同大小
Color Offscreen-Rendered Yellow沒問題了 因為只是簡單的顯示了一張圖片 而并沒有需要離屏渲染的東西了
再來看下幀數(shù)情況
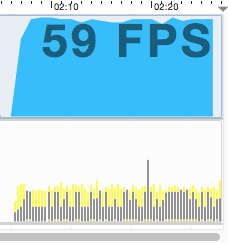
Oh-Yeah~ 不光幀數(shù)達到了我們的目標60幀(由于還有業(yè)務(wù)邏輯線程在后臺跑 所以沒有那么的穩(wěn)定) 就連平均運行耗時都下降了不少 就算地圖上再多顯示幾十個人 也不成問題了
小結(jié)
不光是MKMapView 其實包括UITableView在內(nèi)的很多地方都可以用文中所說的方法去優(yōu)化 其核心點就是 合成+緩存 當然 由于合成還是會耗費一部分資源的 所以比較適合頭像這種小的資源
關(guān)于圖形性能優(yōu)化 可以看下這篇好文(有對文中提到的Debug Option不太明白的 這里有詳細的解釋)